This post may contain affiliate links. If you click and buy, we may earn a small commission at no extra cost to you. Learn more.
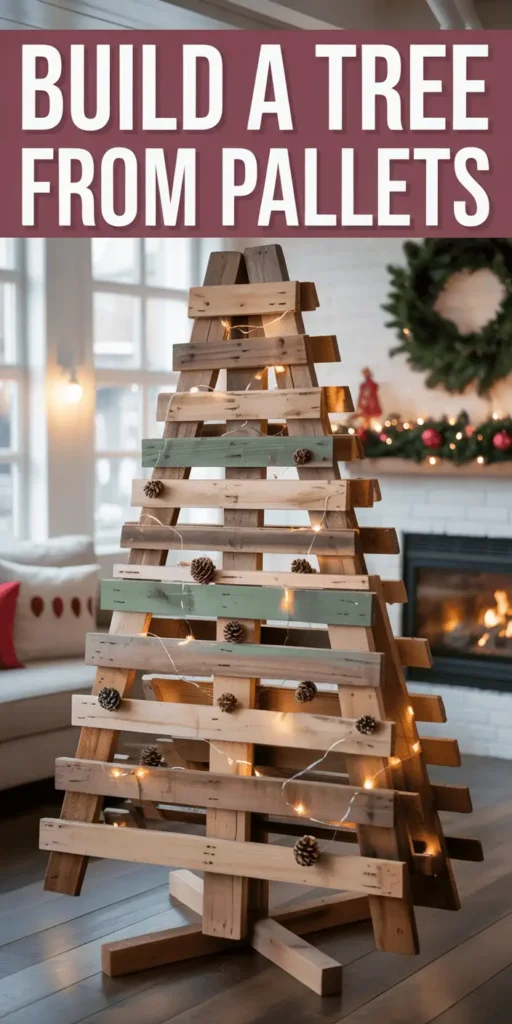
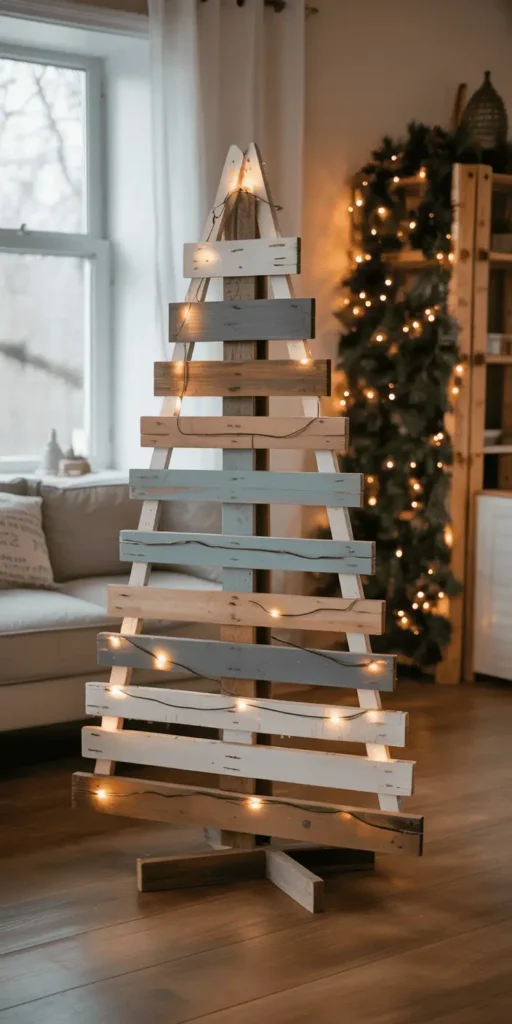
This Christmas, try making a unique wooden Christmas tree from pallets. It’s a green and budget-friendly way to decorate your home. You can make it your own, whether it’s for inside or outside.
Turning old pallets into a Christmas tree is a great idea. It’s not only good for the planet but also lets you show off your style. You can make it look rustic, modern, whimsical, or simple. The choices are endless.
Contents
- 1 Essential Tools and Materials for Your Pallet Christmas Tree
- 2 Selecting and Preparing the Right Pallets
- 3 Planning Your DIY Wooden Christmas Tree Design
- 4 Disassembling Pallets Safely and Efficiently
- 5 Measuring and Cutting Wood Pieces to Size
- 6 Assembly Techniques for a Sturdy Structure
- 7 Adding Creative Decorative Elements
- 8 Finishing Touches and Wood Treatment
- 9 Display Ideas and Placement Options
- 10 Maintenance and Storage Solutions
Key Takeaways
- Eco-friendly and cost-effective way to create unique holiday decor
- Versatile design options for indoor or outdoor display
- Opportunity to showcase your creativity and personal style
- Repurpose discarded pallets for a sustainable project
- Requires basic woodworking skills and a few essential tools
Essential Tools and Materials for Your Pallet Christmas Tree
Making a DIY wooden Christmas tree from pallets needs the right woodworking tools, materials, and safety gear. It doesn’t matter if you’re new to DIY or have experience. Having the correct tools is key for a great project.
Power Tools Required
You’ll need some important power tools to start. A circular saw makes clean cuts. A cordless drill is great for drilling and holding things together. For a smooth finish, use a random orbital sander.
Additional Supplies Needed
- Pry bar or crowbar for dismantling pallets
- Measuring tape and pencil for marking measurements
- Wood glue and wood screws or nails for assembly
- Sandpaper in various grits for finishing the wood
- Paintbrushes or rags for applying wood sealant or stain
Safety Equipment Checklist
Keeping yourself safe is very important when working with pallet disassembly and woodworking tools. Make sure you have the following DIY safety gear:
- Safety goggles to protect your eyes
- Sturdy work gloves to prevent cuts and splinters
- Dust mask or respirator to filter out wood particles
- Ear protection such as earplugs or noise-canceling headphones
With the right tools, materials, and safety gear, you’re ready to start your pallet disassembly and woodworking tasks. Your DIY wooden Christmas tree will turn out amazing.
Selecting and Preparing the Right Pallets
Choosing the right pallets is key for your DIY wooden Christmas tree. The wood quality and pallet condition affect your project’s success. Let’s look at what to consider when picking the perfect pallets and preparing them.
Pallet Selection: Quality Matters
Start by carefully checking the pallet selection. Look for sturdy, high-quality wood for a strong tree. Avoid pallets with damage like cracks or splinters. Wood quality is crucial for a lasting Christmas tree.
Pallet Preparation: Cleaning and Safety
After picking the best pallets, prepare them for your project. Begin by cleaning and checking for hazards like nails. Use tools to remove sharp objects for safety. Clean the pallets with mild detergent to remove dirt.
By following these steps, you’ll have clean, safe pallets for your DIY wooden Christmas tree. Paying attention to detail in selection and preparation ensures a successful project.
Planning Your DIY Wooden Christmas Tree Design
Creating your own DIY wooden Christmas tree is a fun project. You’ll need to pick the right size for your space and choose a style that suits you. The planning stage is key to a great result. Let’s look at the important things to think about when planning your pallet tree design.
Size Considerations
The size of your DIY wooden Christmas tree depends on your home’s space. Measure the area where you’ll put the tree. Consider the ceiling height, corners, and other furniture or decor. This helps you pick the perfect pallet tree dimensions for a balanced look.
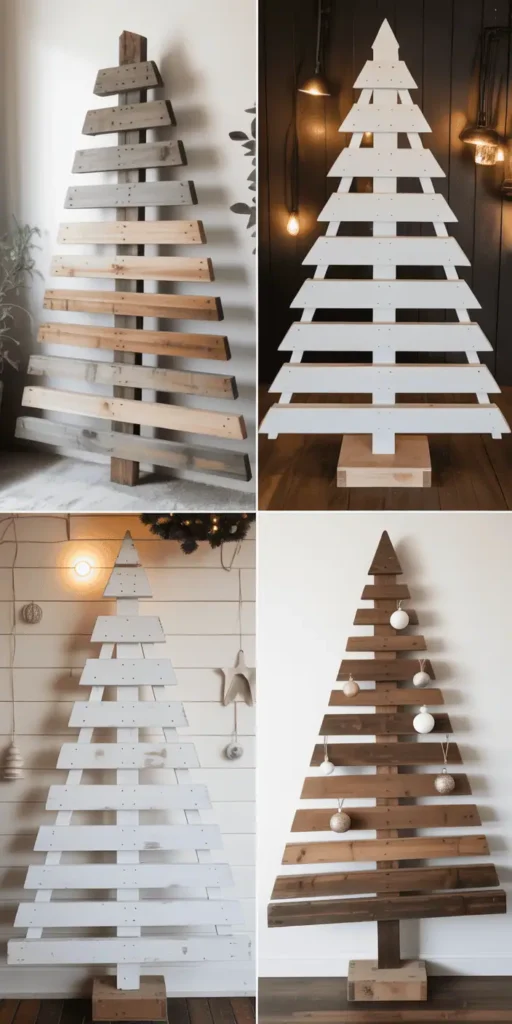
Style Options
Wooden Christmas trees come in many Christmas tree designs. Choose a rustic, farmhouse look with natural wood. Or go for a modern, minimalist pallet tree template with simple lines. Traditional designs might have detailed woodworking or mix materials like pallets and polished wood.
Drawing Your Template
Before you start with the pallets, make a detailed plan. Sketch out your Christmas tree designs on paper. Try different shapes and sizes. This template will guide you in cutting the wood and making sure your tree looks good.
With careful planning, your DIY wooden Christmas tree will turn out great. It will show off your style and fit well in your home.
Disassembling Pallets Safely and Efficiently
Building your unique DIY wooden Christmas tree starts with disassembling pallets. This step, called pallet deconstruction, is key to getting the quality wood you need. It’s the base of your festive project.
To safely and efficiently take apart pallets, you need the right tools and safety measures. Here’s a step-by-step guide to wood reclaiming from pallets:
- Get your power tools ready, like a reciprocating saw, pry bar, and hammer. They’re your main tools for dismantling the pallets.
- Put on your safety gear, including gloves, goggles, and a dust mask. This keeps you safe during the process.
- Begin by carefully prying apart the pallet boards. Use the pry bar to gently separate the wood without damage.
- For tough nails or screws, use the reciprocating saw to cut through them. This makes separating the wood clean and efficient.
- Check each wood piece for any flaws or damage. This could affect its use in your DIY wooden Christmas tree project.
By using these safe pallet dismantling methods, you’ll get the most usable wood. This prepares you for the next part of your creative project.

Measuring and Cutting Wood Pieces to Size
Building a DIY wooden Christmas tree from pallets starts with precise measurements and accurate cutting. This focus ensures your tree is not only sturdy but also looks great.
Creating the Tree Shape
First, measure the pallet wood pieces carefully. You might need to cut them at different angles for a tapered, triangular shape. Use a miter saw or circular saw for clean cuts and consistent angles.
Arrange the cut wood in a symmetrical way, getting smaller from bottom to top. This method helps build the tree shape layer by layer, making it balanced and striking.
Making Support Pieces
You also need support pieces for stability. This includes cross-braces, triangular supports, or more to give a solid base. Measure and cut these pieces carefully, making sure they fit well with the tree and enhance its design.
| Wood Cutting Techniques | Pallet Tree Construction | Precise Measurements |
|---|---|---|
| Miter saw, circular saw | Symmetrical arrangement, graduated size | Consistent angles, balanced design |
“Attention to detail is the key to creating a stunning DIY wooden Christmas tree from pallets. Precise measurements and careful wood cutting will ensure a beautifully structured and visually appealing final product.”
Assembly Techniques for a Sturdy Structure
Making a sturdy DIY wooden Christmas tree from pallets needs careful assembly. Learning wood joinery is crucial. It makes your tree last long and be a favorite holiday decoration.
Joining the wood pieces right is key. Wood joinery methods like lap joints and mortise and tenon joints add strength. They make the wood fit together securely and smoothly.
Fasteners like screws and nails also play a big role in pallet tree construction. Where you place them can make your tree stable and strong. This ensures it looks great all holiday season.
Adding a cross-shaped base or a strong triangle can help. It makes the tree stable and easy to move. This is good for both indoor and outdoor use.
| Joinery Technique | Description | Advantages |
|---|---|---|
| Lap Joint | Two pieces of wood are notched and overlapped to create a strong connection. | Simple to execute, provides good lateral stability. |
| Butt Joint | Pieces of wood are joined together at their ends, secured with fasteners. | Easy to assemble, suitable for less structurally demanding applications. |
| Mortise and Tenon | One piece of wood has a protruding “tenon” that fits into a corresponding “mortise” hole in the other piece. | Extremely strong and durable, often used in furniture and timber frame construction. |

With these techniques and strong supports, you can make a beautiful DIY wooden Christmas tree. It will be a highlight of your holiday for many years.
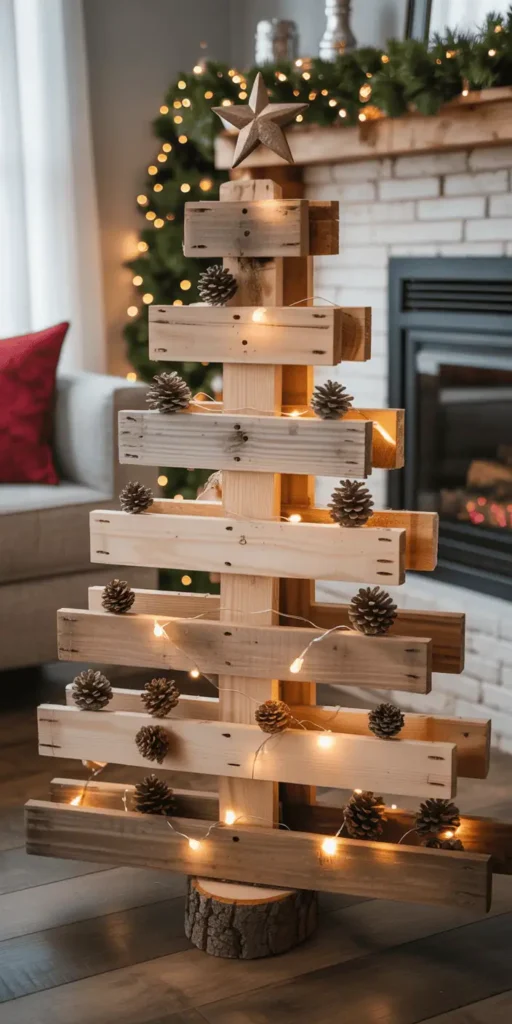
Adding Creative Decorative Elements
Turning your DIY wooden Christmas tree into a stunning centerpiece is all about adding the right touches. Lighting options and ornament placement can make your tree truly stand out. The choices are endless, making your tree unique.
Lighting Options
Use rustic Christmas lights to create a cozy feel. Choose warm white or multicolored LED bulbs to weave through your tree’s branches. These lights not only light up the space but also highlight the tree’s natural beauty.
Ornament Placement Tips
- Hang pallet wood ornaments at different heights for depth and interest.
- Group similar ornaments for a unified look, but mix textures and shapes for contrast.
- Make sure your ornaments are the right size and weight for the branches.
Natural Embellishments
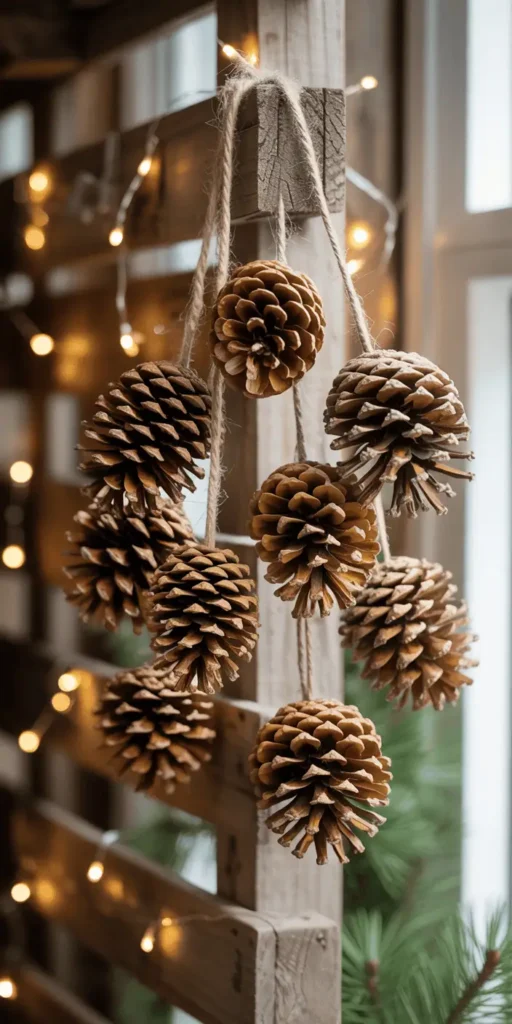
Add a touch of nature with pinecones, dried berries, or greenery. These DIY tree decorations bring rustic charm and a pleasant scent to your display.
Layering these elements creates a stunning holiday display. It celebrates the natural beauty of your handcrafted pallet wood Christmas tree.
Finishing Touches and Wood Treatment
After making your DIY pallet Christmas tree, it’s time to add the final touches. Protecting your work is key, whether it’s indoors or outdoors.
Staining for a Polished Look
Applying a wood stain can make your pallet wood look amazing. Wood staining not only colors it but also seals and protects it. Choose a stain that fits your tree’s look.
Sealing for Weather Protection
Outdoor trees need weather protection. Use a clear sealant or polyurethane to keep the wood safe from the weather. This way, your tree can last through the seasons.
Finishing with a Pallet-Inspired Touch
For a unique look, lightly sand the wood. This keeps the natural pallet wood finish visible. It adds a rustic charm to your holiday decoration.
| Wood Treatment Option | Benefits | Best For |
|---|---|---|
| Wood Staining | Enhances color, seals surface | Indoor and outdoor use |
| Weather-Resistant Sealant | Protects against elements | Outdoor display |
| Lightly Sanded Pallet Finish | Retains natural character | Rustic, farmhouse-inspired look |
With the right wood staining, weather protection, and pallet wood finish techniques, your DIY pallet Christmas tree will be ready to dazzle and delight for years to come.
Display Ideas and Placement Options
Showing off your DIY wooden Christmas tree is key. You can display it indoors or outdoors. There are many creative ways to make it stand out in your Christmas tree display, outdoor wooden decorations, and holiday home decor.
Indoor Setup Tips
For indoors, put your wooden tree in a spot like the living room or entryway. Add decor like string lights, ornaments, and natural items. Make sure it’s on a strong base to avoid it falling.
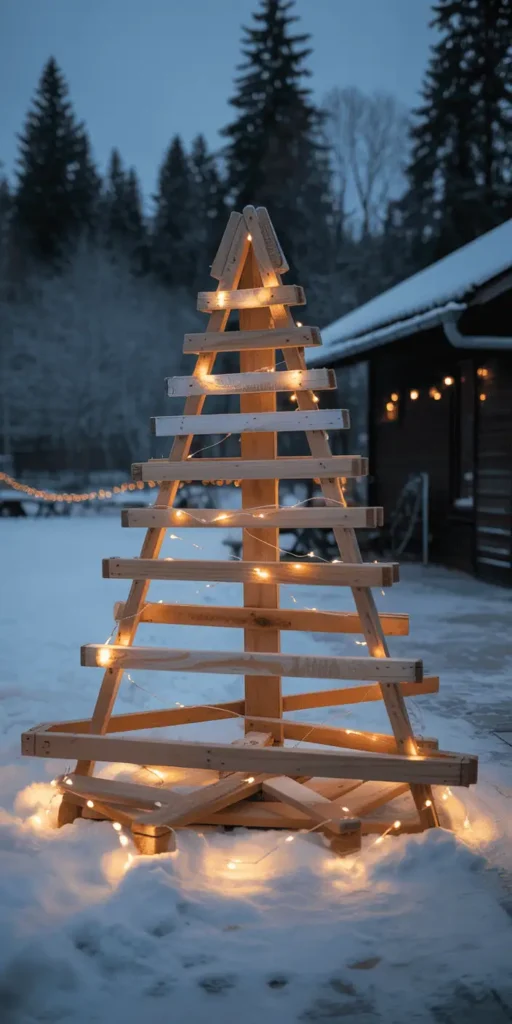
Outdoor Installation Guide
For outdoors, pick a spot that’s safe from bad weather. Make sure the tree is well-anchored to the ground or a platform. Use weatherproof lights and decorations to make it festive. Don’t forget to seal the wood to protect it from the weather.
Wherever you show your DIY wooden Christmas tree, aim for a beautiful and fitting holiday home decor. With creativity and care, it will be the highlight of your holiday.
Maintenance and Storage Solutions
Keeping your handcrafted wooden Christmas tree looking great is key. Clean it regularly with a soft cloth and a mild wood cleaner. This helps keep the natural finish and stops dust from building up. For small scratches or nicks, use a wood marker or stain to fix them.
When the holidays are over, it’s important to store your tree right. Take it apart and wrap each piece in acid-free tissue or muslin to avoid scratches. Keep the pieces in a cool, dry spot, away from sunlight and moisture. This helps protect the wood from damage during the off-season.
By following these easy wooden decor care and off-season storage tips, you can keep your DIY Christmas tree preservation in top shape. Enjoy your special holiday decoration for many years.
To bring you cozy inspiration more efficiently, we sometimes use AI to assist in content creation — but every word and idea is carefully shaped by our team. See our AI Disclosure for more info.